Salesforce WhatsApp Cloud API Integration: Setup and Sending Messages
Use case
Communicating with customers is not as simple as just sending an email anymore. With inboxes overflowing with content, plenty of which was unsolicited, it is all too easy to end up in the junk folder or outright deleted for no other reason than the overwhelming number of new emails. To surmount this challenge our skilled developers will walk you through how to set up API integrations with WhatsApp so you can communicate with customers on their preferred platform without losing any integration with Salesforce.
Introduction
WhatsApp Cloud API allows businesses to send and receive messages using the cloud-hosted version of its WhatsApp Business API. The main advantage of WhatsApp Cloud API is that it is hosted by Meta, unlike WhatsApp On-Premises API. With this, WhatsApp Business users can implement WhatsApp Business API without the cost of hosting it on their own servers, and also, there is no need to rely on third-party business service providers (BSPs) like Twilio, Wabi, etc.
Setting up WhatsApp Cloud API
To set up the WhatsApp Cloud API, follow the steps below:
Register as Meta Developer
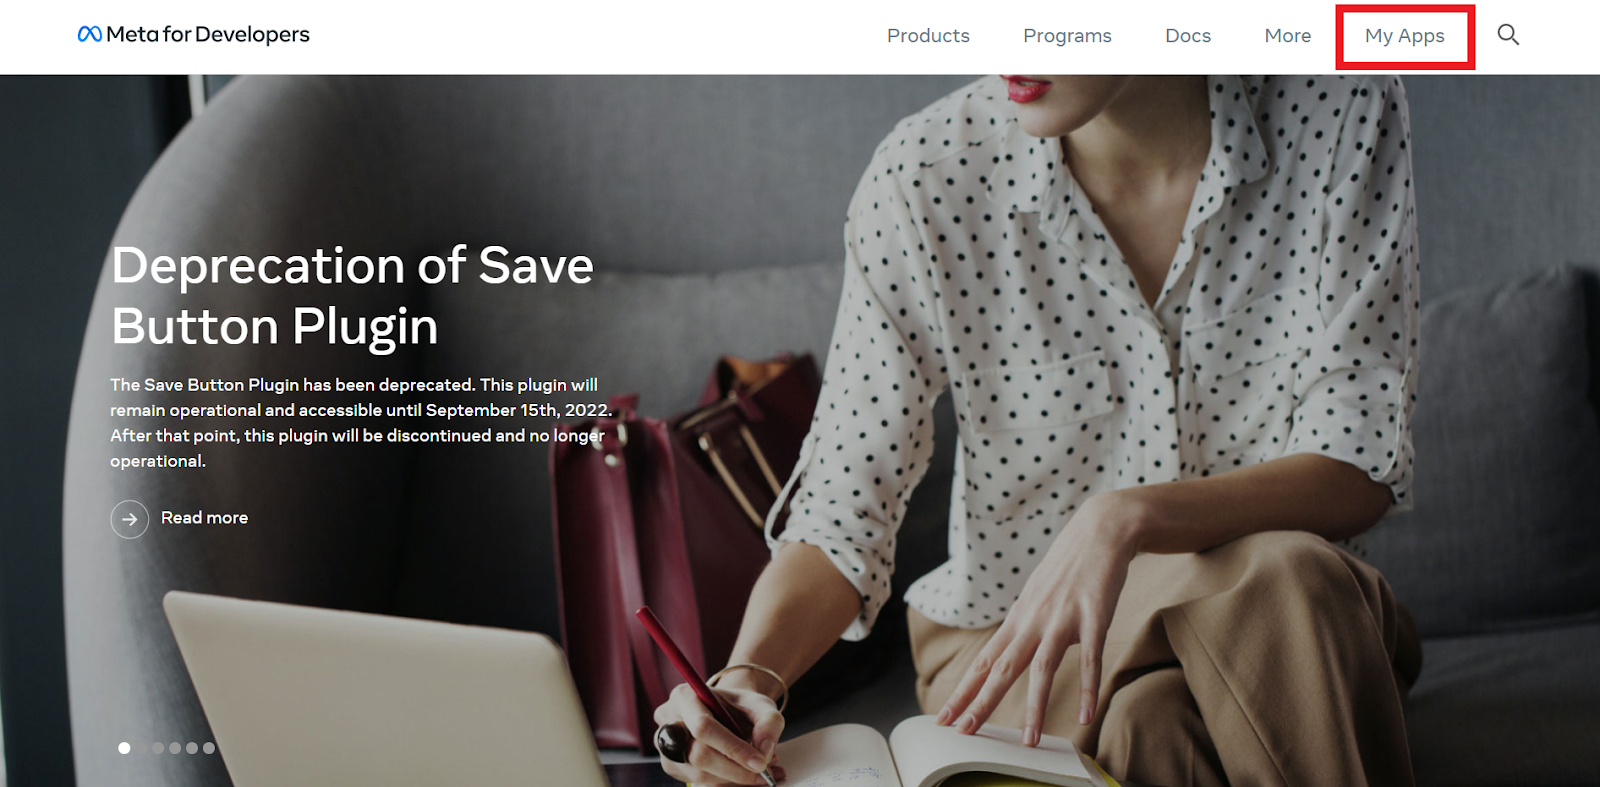
Visit Facebook for developers, and log in using your Facebook credentials. On successful login, click on My Apps on the homepage.
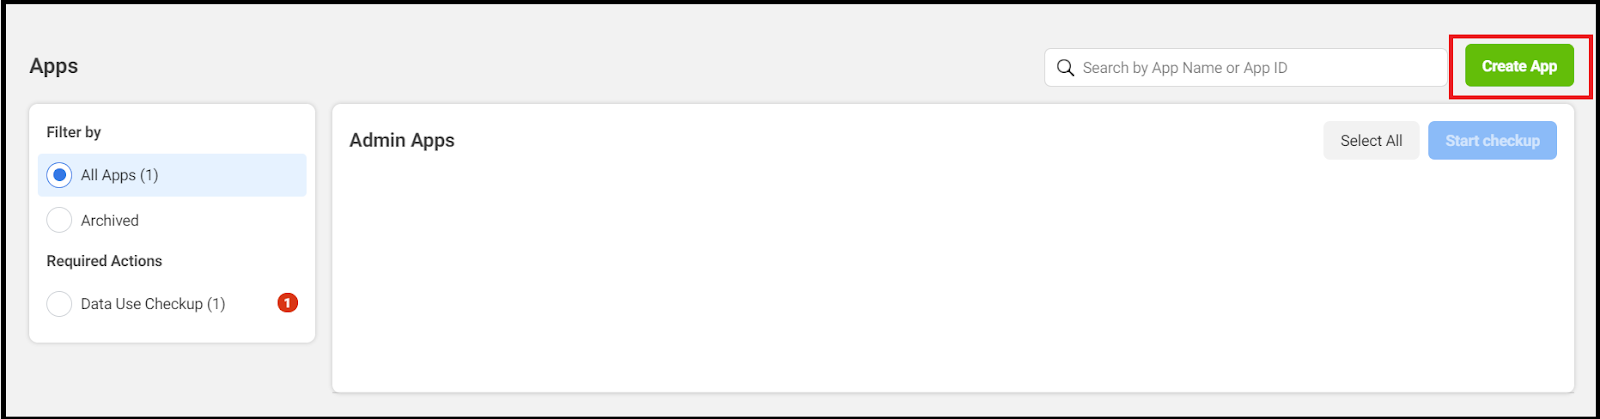
This navigates you to a screen where you will find an option to Create App. Click on it.
Select Business as your app type and click on Next.

You will be navigated to the details section where you have to provide some basic information. WhatsApp Cloud API doesn’t need a verified Facebook Business Manager. Hence, you can select No Business Manager Account Selected under the Business Account field and click on Create App.

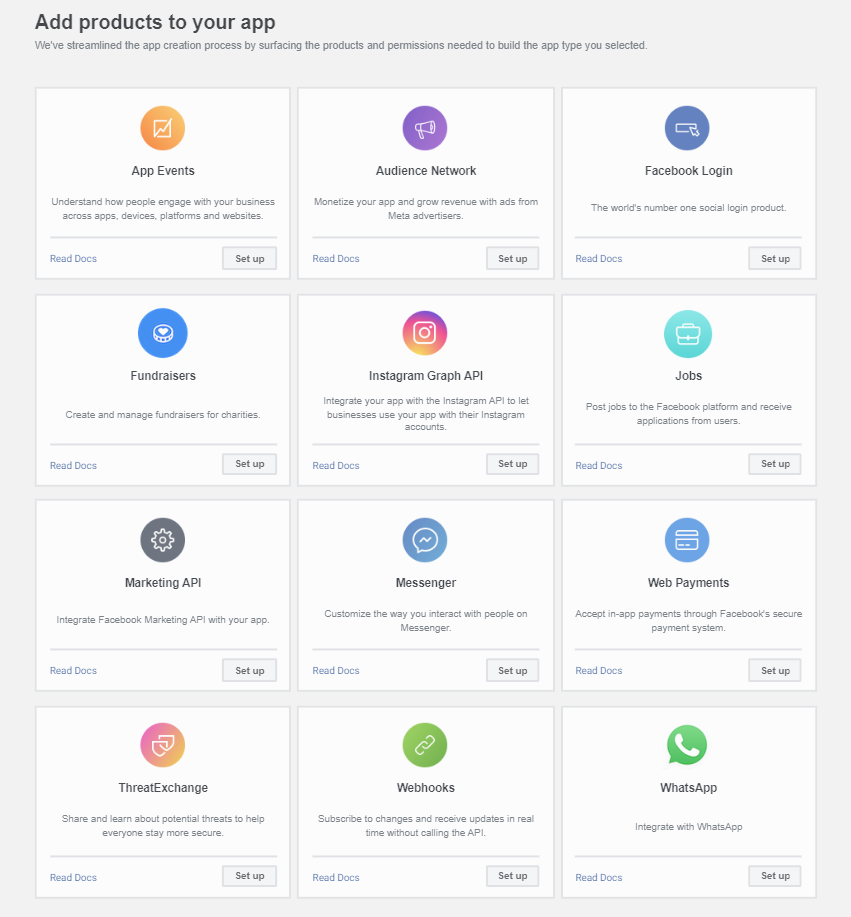
This completes the login process and takes you to the Meta Dashboard. Here, scroll down to select WhatsApp as your product to integrate.
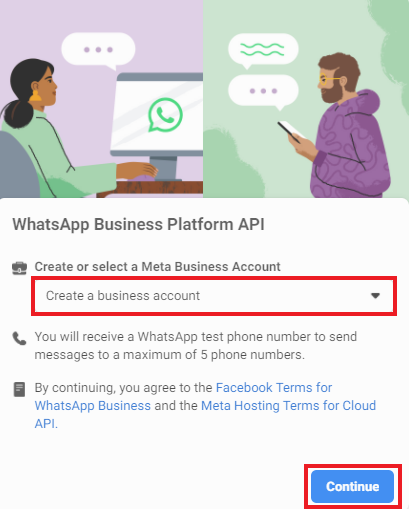
On the WhatsApp get started page, choose to Create a business account option from Create or select a Meta Business Account dropdown and click on Continue. Now you are good to go.
With this, the setup is complete and you will be navigated to the App Dashboard where you can find your Business Account details.
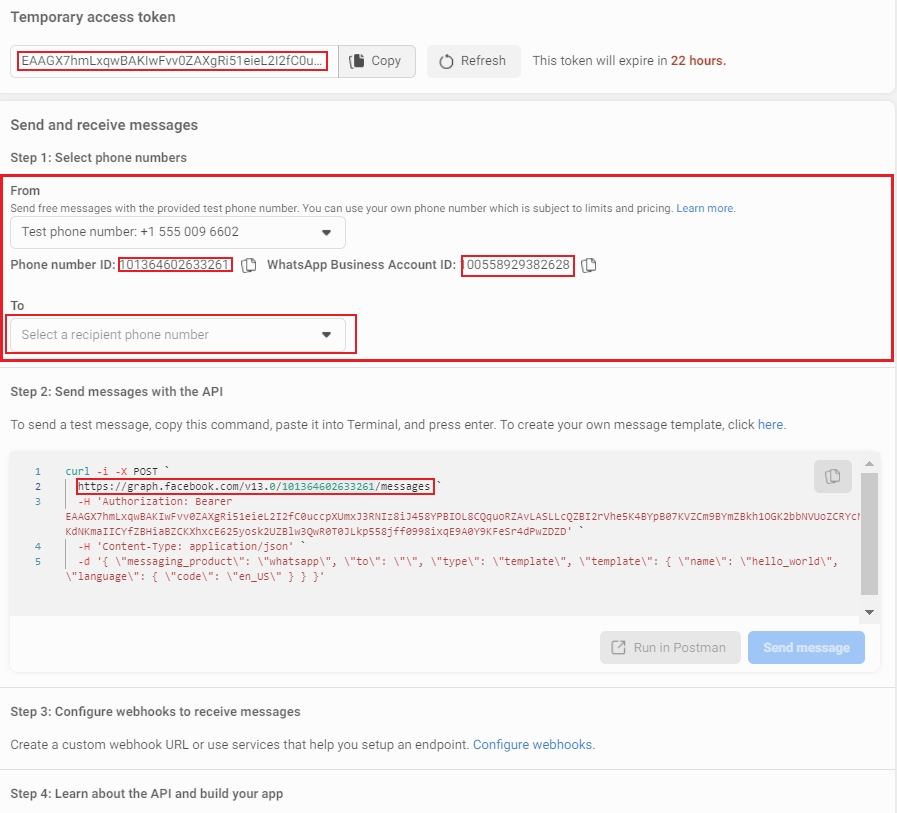
You are provided with the following details on the App Dashboard:
- Temporary Access Token: Every request should be authenticated with the access token. The temporary access token expires every 24 hours. To learn how to generate a permanent user access token, click here.
- From Number: This is a test number that is provided to you. Using this number, you can send messages to recipients.
- Phone Number Id & WhatsApp Business Account Id: These are the unique Ids generated for your account.
- To Number: This is the WhatsApp-enabled recipient number to which you wish to send messages.
- Command to Send a Test Message: This command has the request payload details to send the test message.
Registering a Phone Number
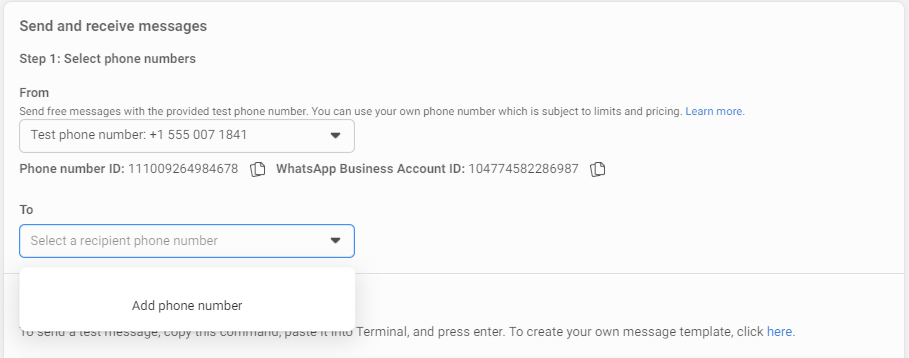
Only WhatsApp-enabled phone numbers can be registered as recipients. You can add up to 5 phone numbers. Once a phone number is registered, it cannot be deleted. This limitation is only for WhatsApp-provided test phone numbers. Real phone numbers that you register do not have a limit on the number of recipients.
Select the To field and click on the Add phone number as shown in the below screenshot to register the phone number you would like to send a message to.
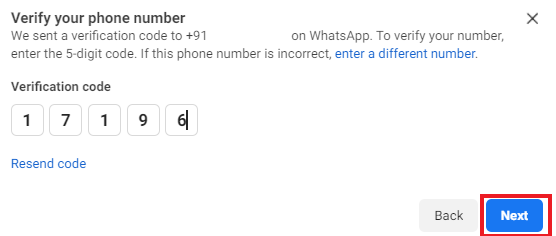
You will see a pop-up where you have to select the country and enter the phone number you want to register on by clicking the Add phone number button and click on Next.

This sends a verification code to the phone number on WhatsApp from Facebook Business.

Enter this code and click on Next to verify the phone number. This completes the registration process.
An Id will be generated for the registered phone number that is prefixed with the country code.
Sending a Test Message to Registered Phone Number
You can find the command to send the test message highlighted in the below screenshot. Select the number that you just verified from the drop-down in the To field and hit the Send Message button.
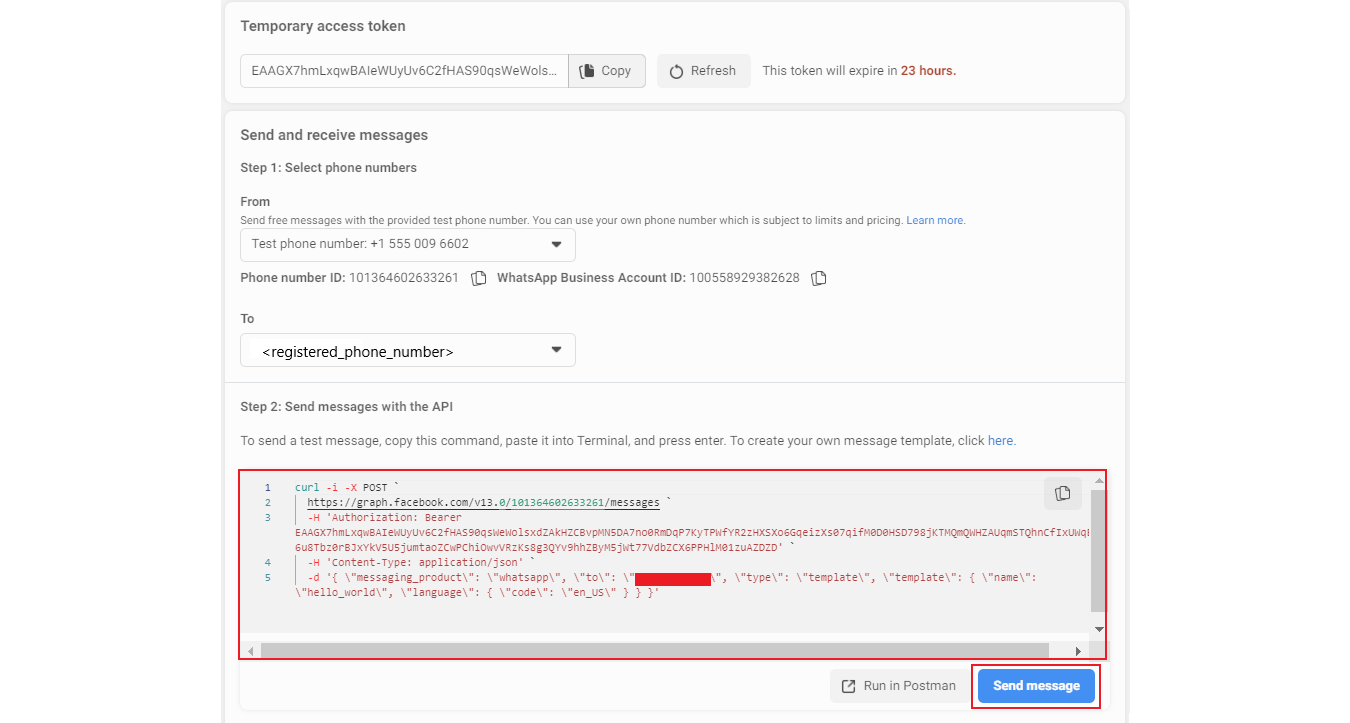
This sends the default pre-approved hello_world template-based message.

This template is available by default once the account is set up. Below is the screenshot of the template:
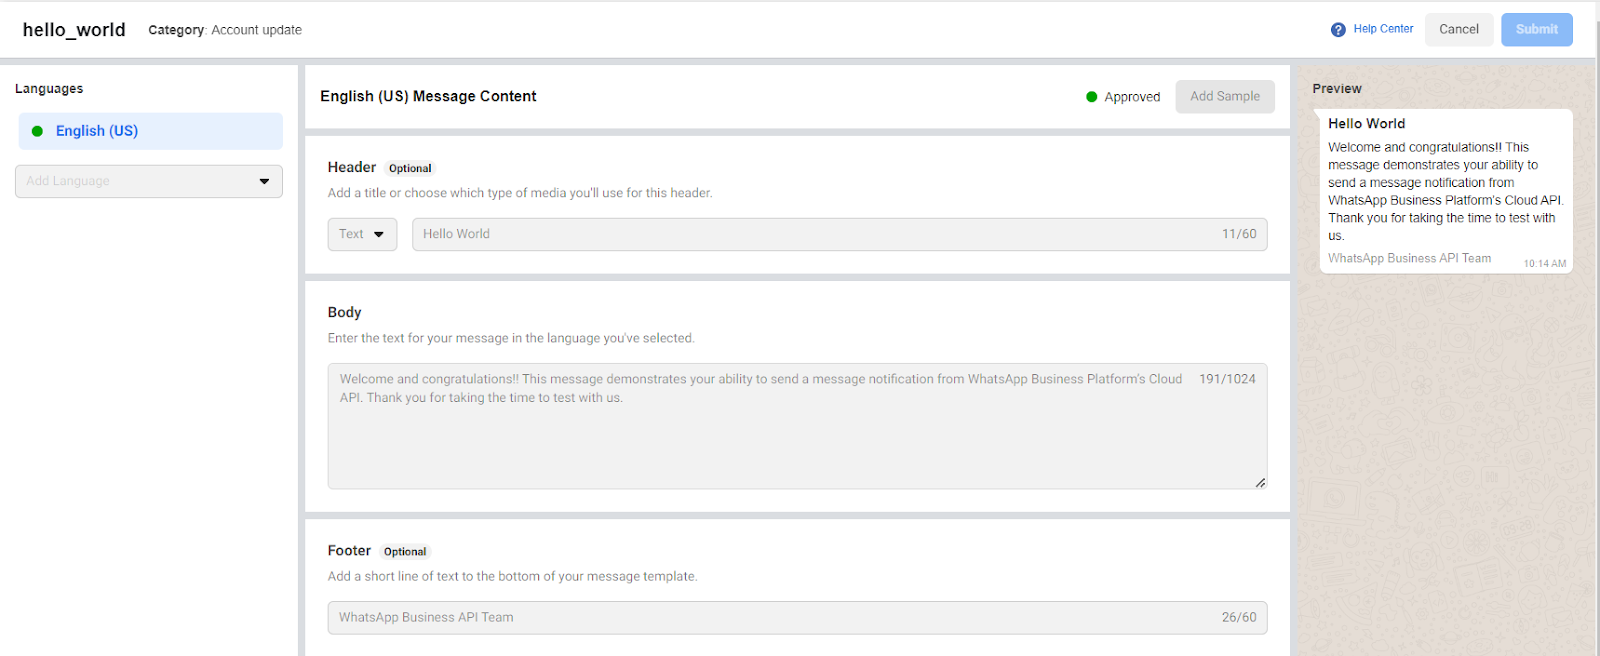
The payload for this template message has the below-listed details as shown in the screenshot.

- messaging_product: This is always set to whatsapp.
- to: Holds the recipient's phone number Id.
- type: Specifies the type of the message. In this case, it is the hello_world template.
The rest of the payload changes based on the type of message that holds message data respectively. Since the template is chosen, in this case, it holds the template data which specifies the name of the template, that is hello_word, and the language in which the message has to be sent.
Configuring Templates in WhatsApp
You can also configure your own custom templates in WhatsApp. Click on the highlighted portion as in the below screenshot to configure message templates.

This takes you to a screen where you can see the list of approved templates and also an option to create your own templates.

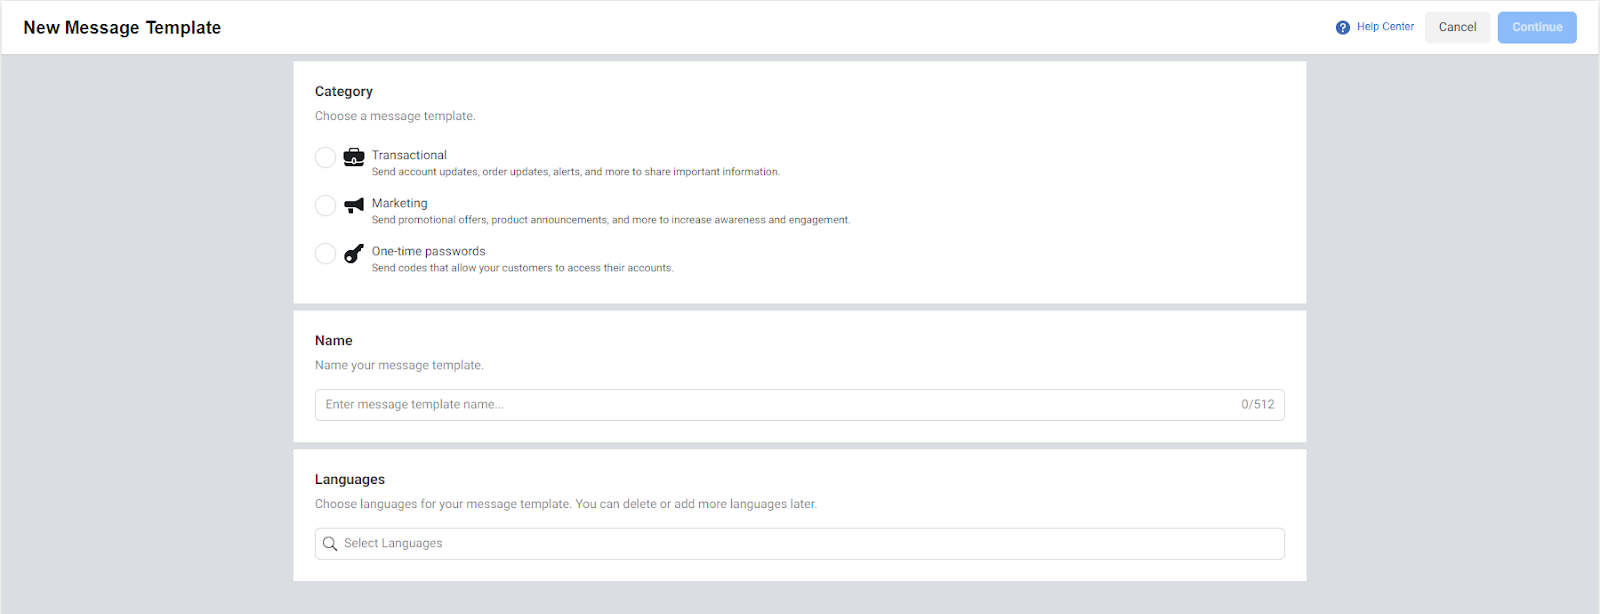
On clicking the Create Message Template button, you will be directed to the below screen where you can choose the Category of the template, template name, and the languages it supports. Click on Continue once your selection is done.
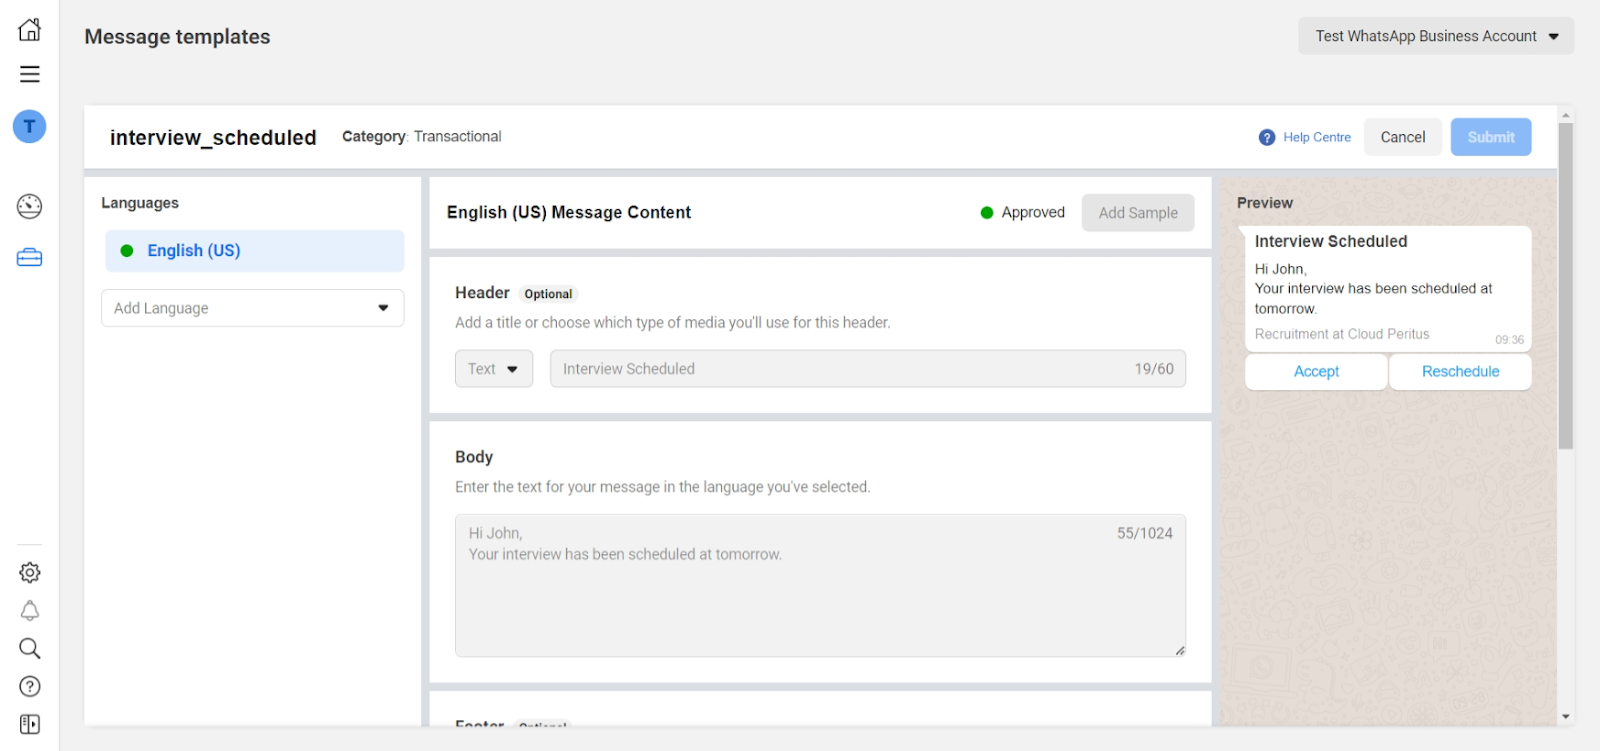
This takes you to the screen where you can configure the message header, footer, and body. You can also add any quick replies or call-to-action buttons to make the message more interactive.
Once submitted, it will take 6-24 hours for any message template to get approval from WhatsApp. You will need these templates for all the business-initiated conversations.
Types of Conversations in WhatsApp
There are Two Types of conversations on WhatsApp.
- Business-Initiated Conversations: As the name suggests, these are the conversations initiated by businesses with customers. These messages require a pre-approved template and prior opt-in. These are priced per conversation.
- User-Initiated Conversations: These messages are initiated by the customers. These messages don't need pre-approved templates or prior opt-in.
Types of Messages in WhatsApp
You can send the following message types:
- Text messages
- Media messages: image, video, audio, and document messages
- Contact messages
- Location messages
- Interactive messages: List messages, Reply button messages, and Single and Multi-product messages
- Message templates
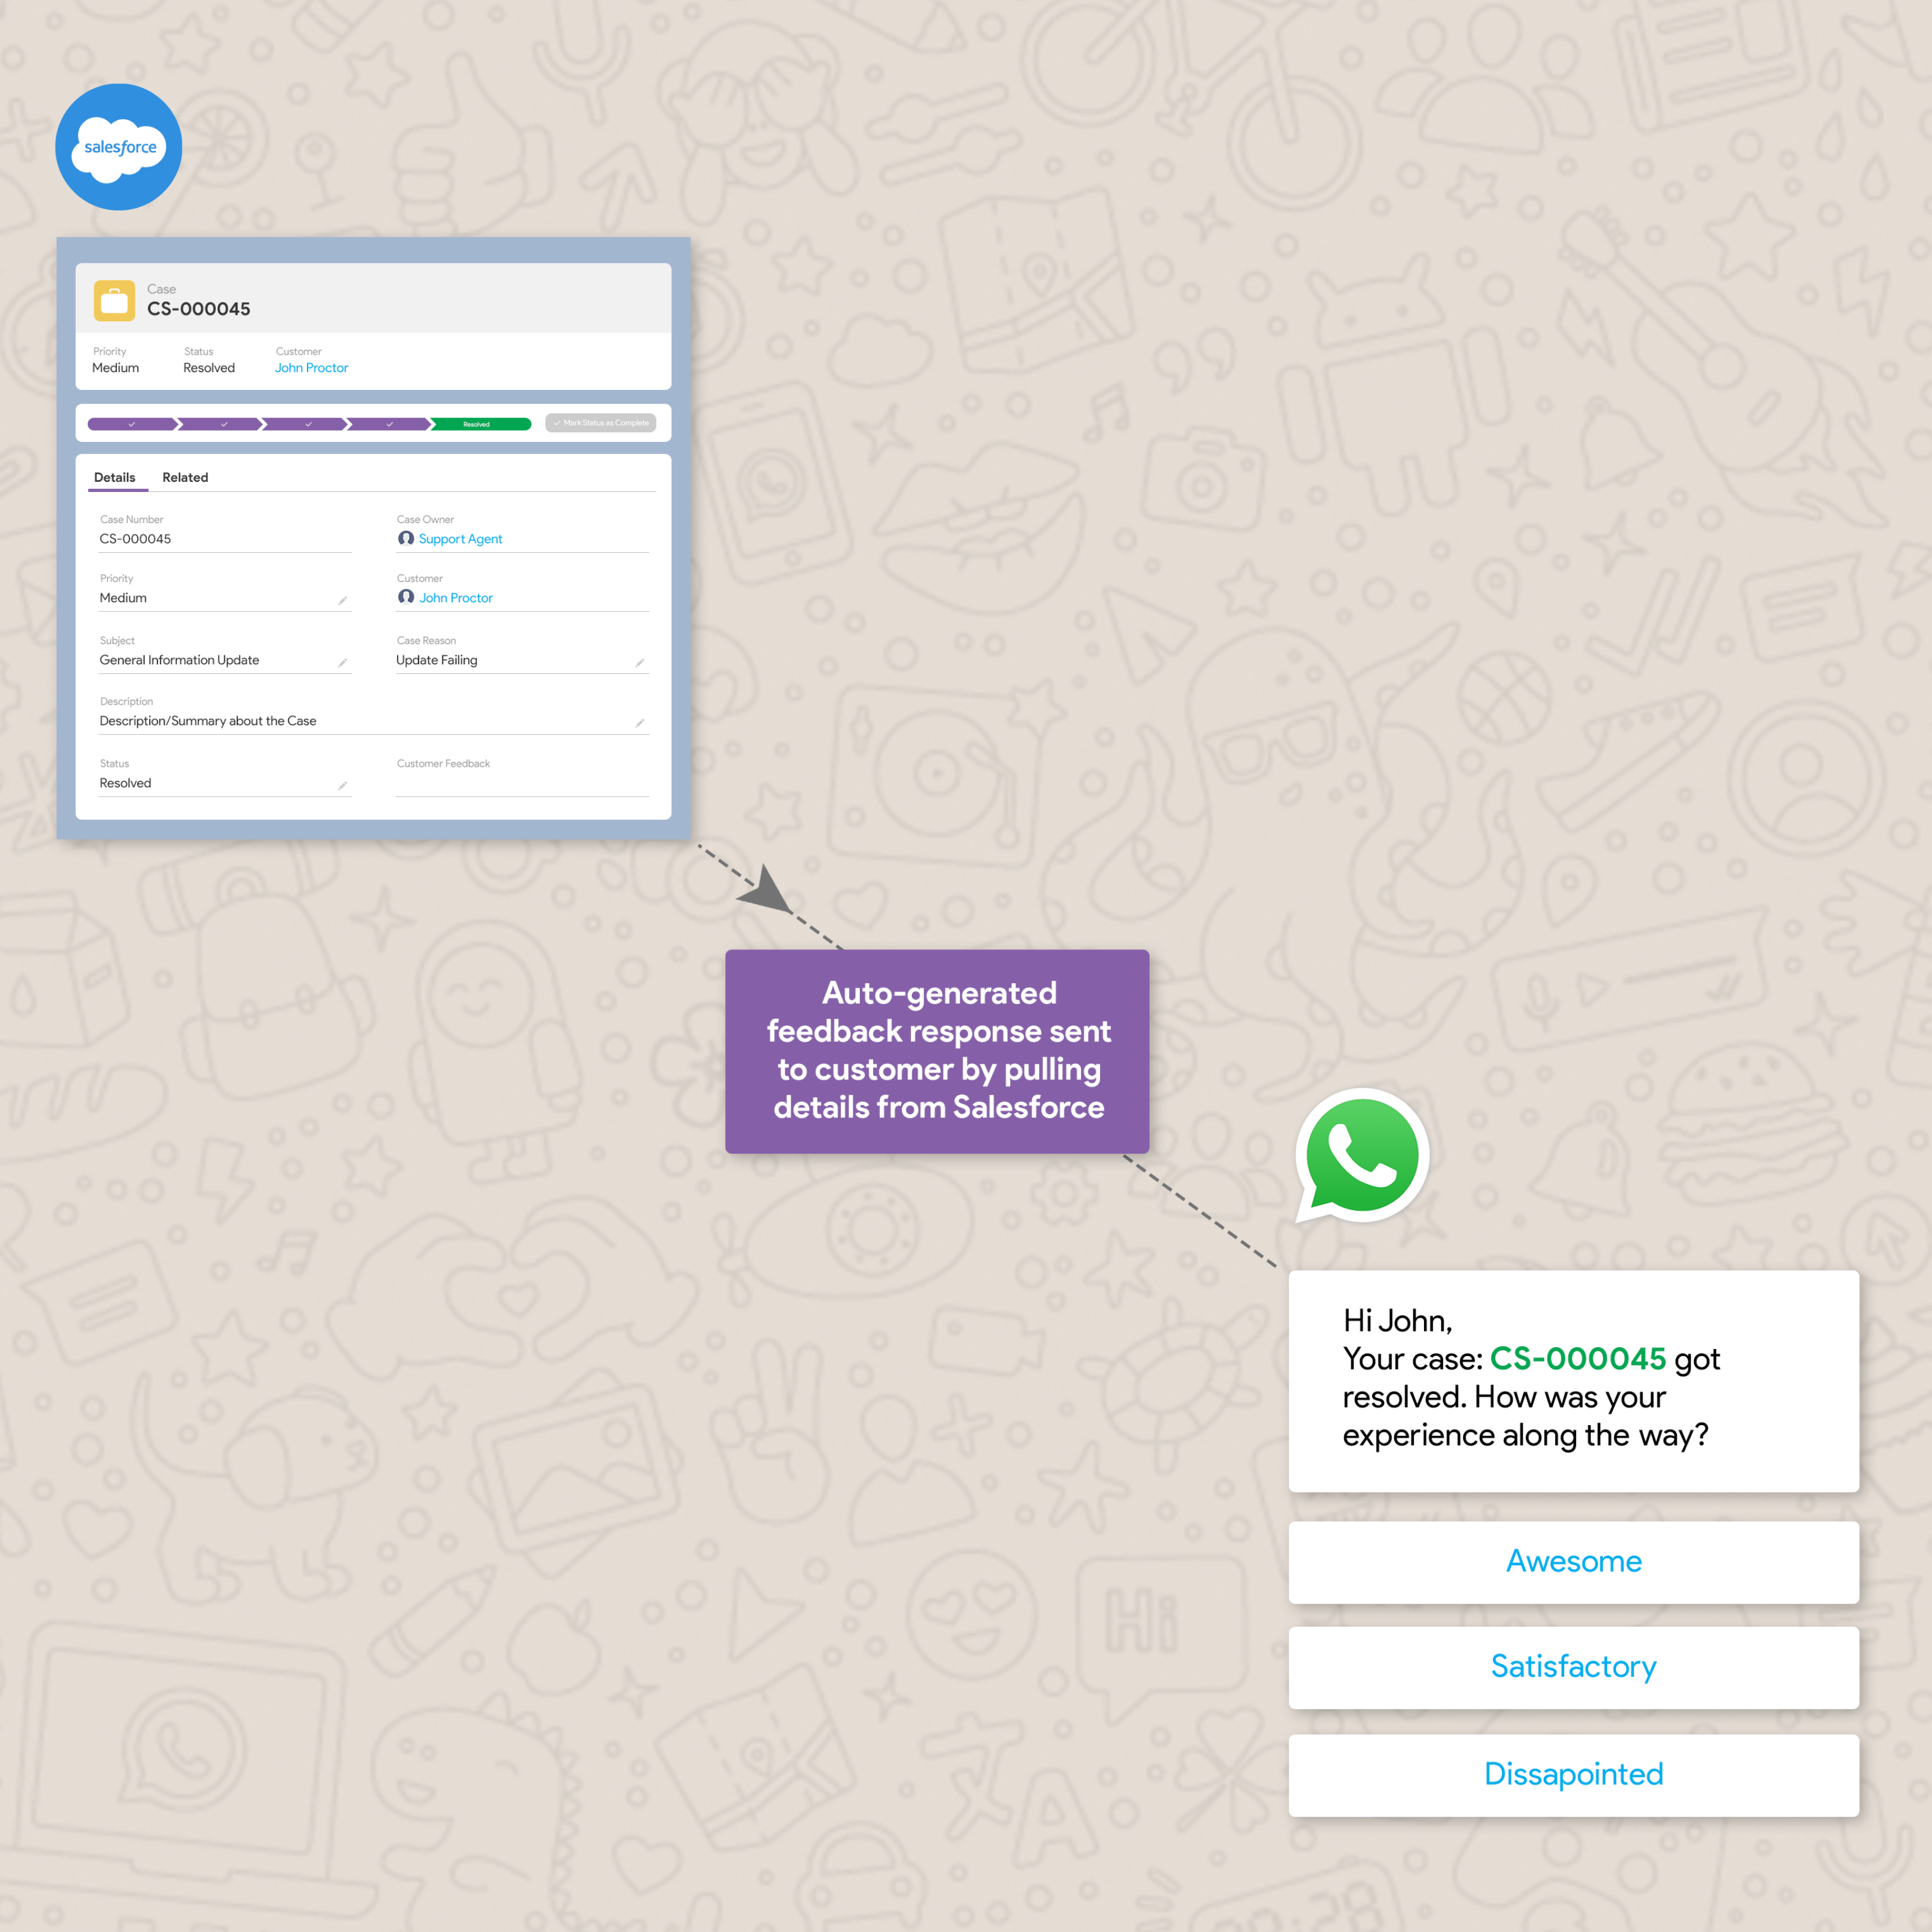
Let’s see this in action from Salesforce
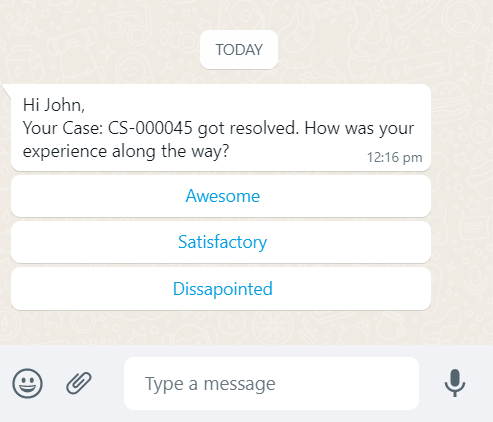
Imagine we have a requirement where we want to message the customer when a Case record is closed to capture their feedback. We will use the Interactive Message Type with Reply buttons as shown in the image below.

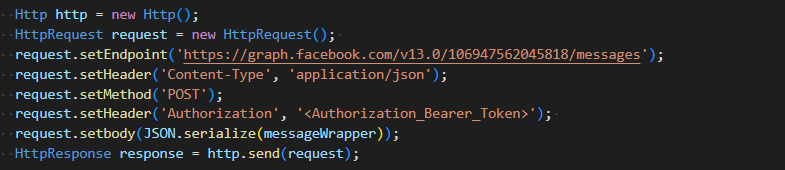
WhatsApp Cloud API uses Meta’s Graph API for integrations. The endpoint URL to send messages is https://graph.facebook.com/v13.0/{{Phone-Number-ID}}/messages. The Phone Number ID in this URL is nothing but the test phone number ID which was created during account setup.
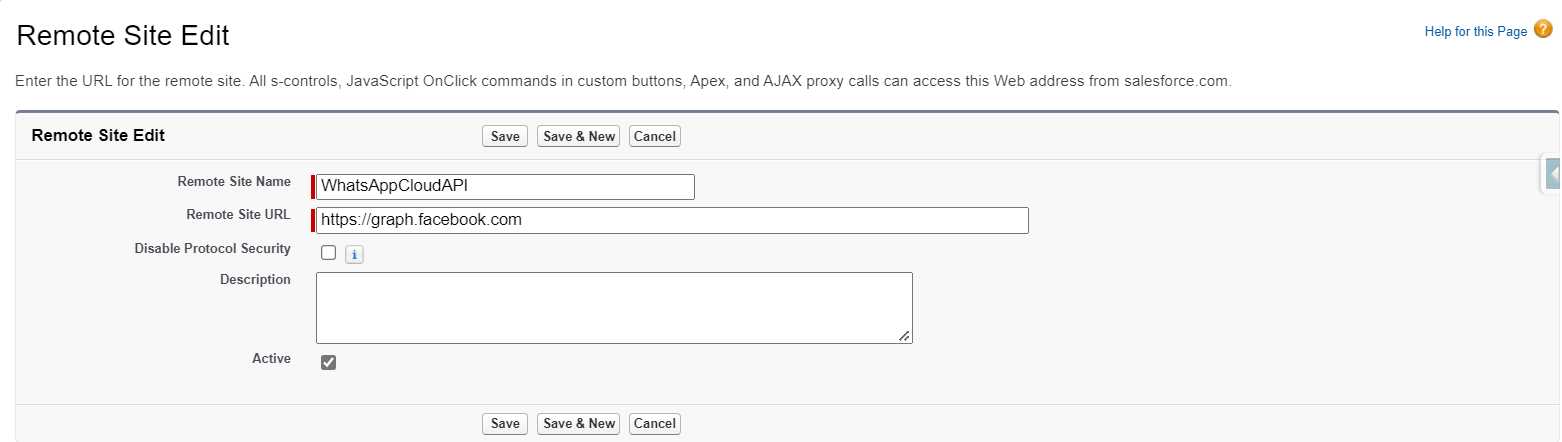
In order to allow callouts to the Graph API, we need to add https://graph.facebook.com to Remote Site Settings in Salesforce.
Below is a sample payload structure for interactive messages.
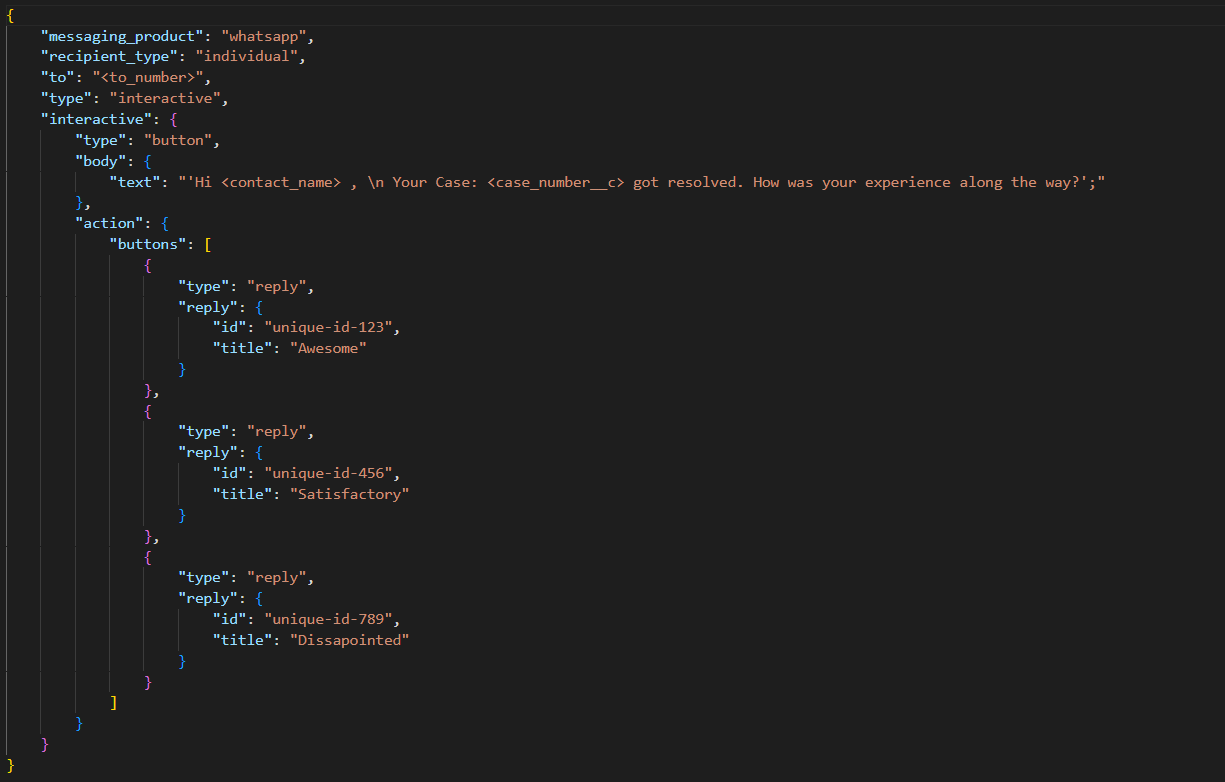
The recipient_type is set as the individual as the API currently supports only individual recipients. Since we are sending interactive messages with Reply buttons, we need to define the type as a button in the payload. On Case closure, make an HTTP POST request to the messages endpoint URL mentioned above.

Every request should include the following details:
Method: The action being requested of the endpoint. Most commonly GET, POST, etc.
Header: Meta information about the request. All requests that contain a message body should set the Content-Type in the header (e.g., “Content-Type:application/json”). The Header must also contain the Bearer Access Token. To learn how to get the access token programmatically, click here.
Body: It contains the message payload shown above. We can construct this payload in Apex using the wrapper class generated from JSON.
On a successful callout, the interactive message will be delivered to the recipient’s phone number.
NOTE: In Interactive Messages with buttons, the minimum allowed buttons are 1, and the maximum number of buttons allowed is 3.
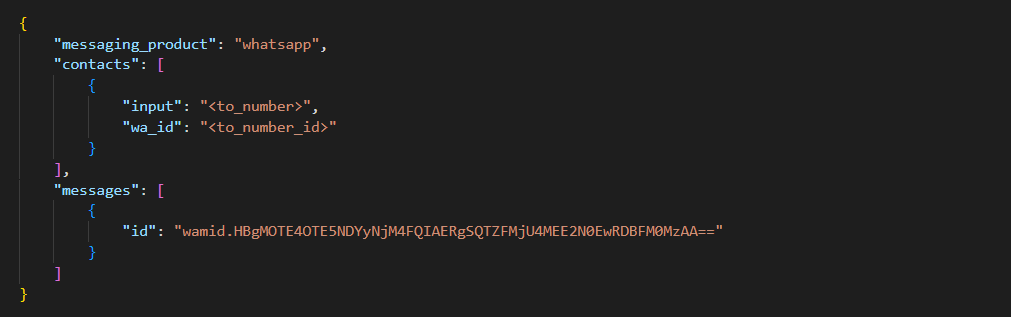
Successful response payload returns with the details of the recipient to which the message was sent along with the message ID.
Conclusion
Here our first installment comes to an end, but by no means is the journey over! Our dedicated developers have shown you how to integrate WhatsApp’s API into Salesforce and the added benefit of the API being hosted by Meta so no need to host on your own server or rely on a third party (don’t contain yourself people, DANCE WHEREVER YOU ARE WITH RECKLESS ABANDON)! Now that you have gotten that out of your system, we await your return for our next installments on generating access tokens and sending and receiving messages from WhatsApp in Salesforce. Until then, keep making the world a more integrated place!
If you are interested in learning more about how we can address your complex business needs through our innovation and thought leadership, please reach out to info@cloudperitus.com or visit our website www.cloudperitus.com.
Read More
WhatsApp Cloud API Integration: Generating Permanent Access Token
WhatsApp Cloud API Integration: Generating Access Token With Facebook Login