Amazon Connect Integration with Salesforce Open CTI - Custom Screen Pop Page with LWC
Introduction
Service Cloud Voice was first announced by Salesforce at Dreamforce 2019 and launched in mid-2020. I won’t go into details about the product itself here but you can read more about it here.
Prior to Service Cloud Voice, telephony providers would integrate with Salesforce through their Open CTI and agents would manage calls through a softphone widget which is generally provided by the telephony provider in a managed package. Amazon Connect is the pre-integrated telephony solution for Service Cloud Voice but other telephony providers also have the ability now to integrate with it.
Although it is quite nice for agents to be able to manage their phone channel directly through Salesforce Omni-Channel alongside other service channels like Chats and Cases, the cost for Service Cloud Voice licenses is not exactly cheap. Even if your company is not considering Service Cloud Voice, Amazon Connect is still a very attractive call center solution and should definitely be one to consider if your company is on the search for a new CTI solution.
This article will be the first in an Amazon Connect - Salesforce blog series. I’m not going to cover setting up Amazon Connect with Salesforce since there is already a great guide you can get directly from AWS and paraphrasing something that is already readily available doesn’t provide much value-add in my opinion. Instead, I’ll cover various use cases throughout the series which haven’t already been covered elsewhere (to the best of my knowledge). The use cases may not always be applicable to everyone but the underlying goal is to give you an idea of what is possible.
Use Case
One of the most common customizations done when a company is implementing a CTI solution in their Salesforce instance is a custom screen pop page. This depends on your Softphone layout configuration but when a caller calls into your customer support, it is usually configured so that it would open the Contact record page if a singular match is found or open the Contact global search page otherwise. But let’s say your support agents would like a more tailored experience, whether it is to see different fields from the default Contact Search Layout, have the search automatically include certain filters, perform different actions, display a list of recently opened cases under the same phone number, etc. Currently, this would be done by configuring the Softphone Layout to pop open a Visualforce Page (Flow is also now supported). It does not currently support opening a Lightning Component directly but there are some workarounds you can do. Embedding the Lightning Component in your Flow, using Lightning Out in your Visualforce Page, or navigating to the Lightning Component programmatically are some options.
With Amazon Connect’s CTI Flow feature, it is possible to achieve this without configuring the Softphone Layout and to open up a Lightning Web Component directly.
Solution
Prerequisites
1. Amazon Connect managed package has been installed and basic configuration are completed. You can view and follow the official installation guide here.
2. A user has been provisioned in your Amazon Connect application to accept inbound calls.
3. The same user has been associated to the Amazon Connect Call Center in Salesforce and the softphone utility widget has been added to the Service Console application.
Creating a CTI Flow
1. Navigate to the AC CTI Adapter tab in Salesforce and open the ACLightningAdapter record.
2. At the bottom of the page, select the CTI Flows tab and click on the New button.

3. In the New AC CTI Script page, enter the following inputs below and click Save.
- CTI Script Name = ‘Create Screen Pop’
- Source = Amazon Connect Voice Contact
- Event = onConnecting
- Description = Screen pop to LWC on Inbound Call
- Active = True

4. Scroll down to the CTI Flow section of the page, this is where you will design your new CTI Flow.
5. Before we start implementing our CTI Flow, let’s go over the process at a high-level.
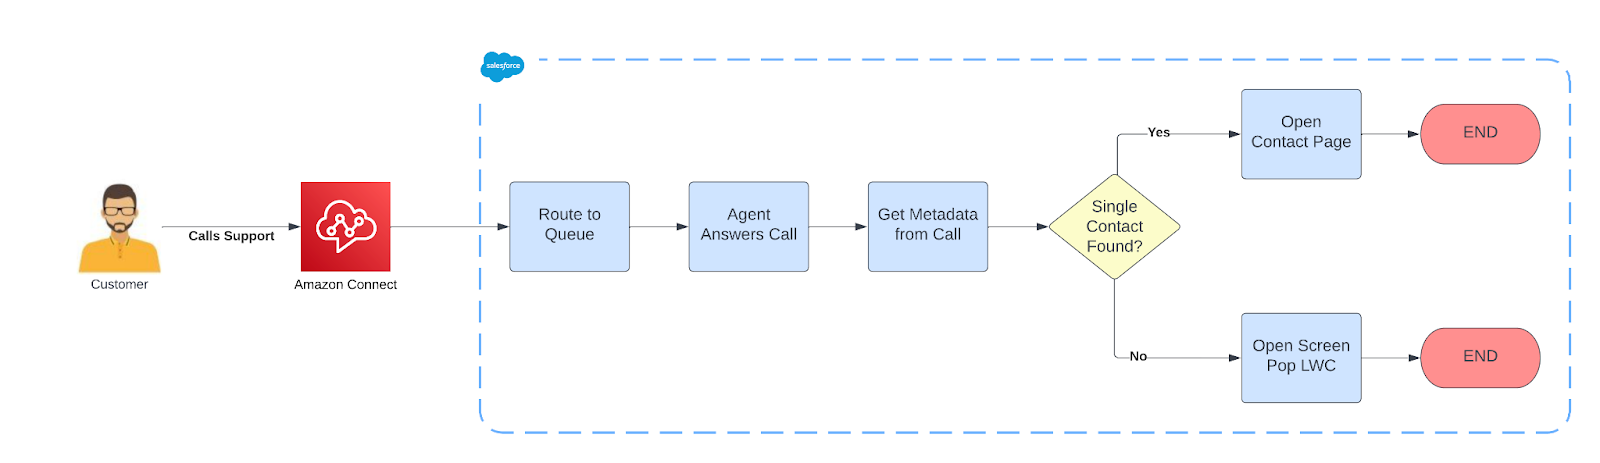
When a customer calls in, we want the CTI to open the Contact page if a single Contact match is found. Otherwise, open a LWC that would be the screen pop page for the support agent who answered the call. That LWC does not exist yet so let’s create that now.
Creating a Screen Pop LWC
I won’t go over the code in detail since this is not intended to be an LWC development guide but you can reference the LWC and Apex source code in our GitHub repository.
Creating a Lightning Component Tab
1. In order to load the LWC in its own page, we need to associate it to a Lightning Component Tab.
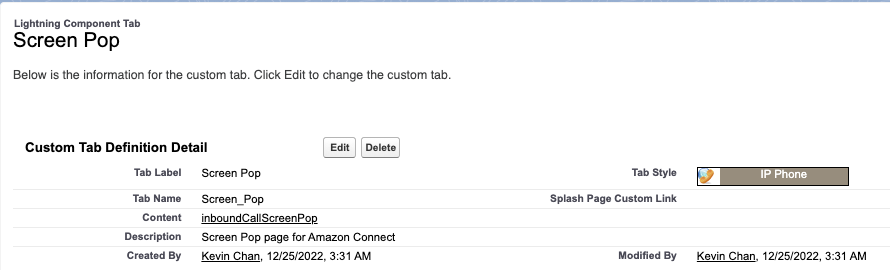
2. In Setup, navigate to User Interface → Tabs → Lightning Component Tabs and click New.
3. Below is a sample of what the Tab definition should look like once it’s created.
4. Now that we have our LWC and Lightning Component Tab, let’s go back to our CTI Flow to wrap it up.
Creating Screen Pop CTI Flow
1. Navigate back to the Create Screen Pop CTI Flow record created earlier. We are finally ready to start actually implementing the CTI Flow itself.
2. If I was implementing this for an actual client, I would have a lot more validations and decision trees in the flow but for the sake of keeping this simple, we are going to just implement the flow so that every inbound call should open up our custom LWC Screen Pop page.
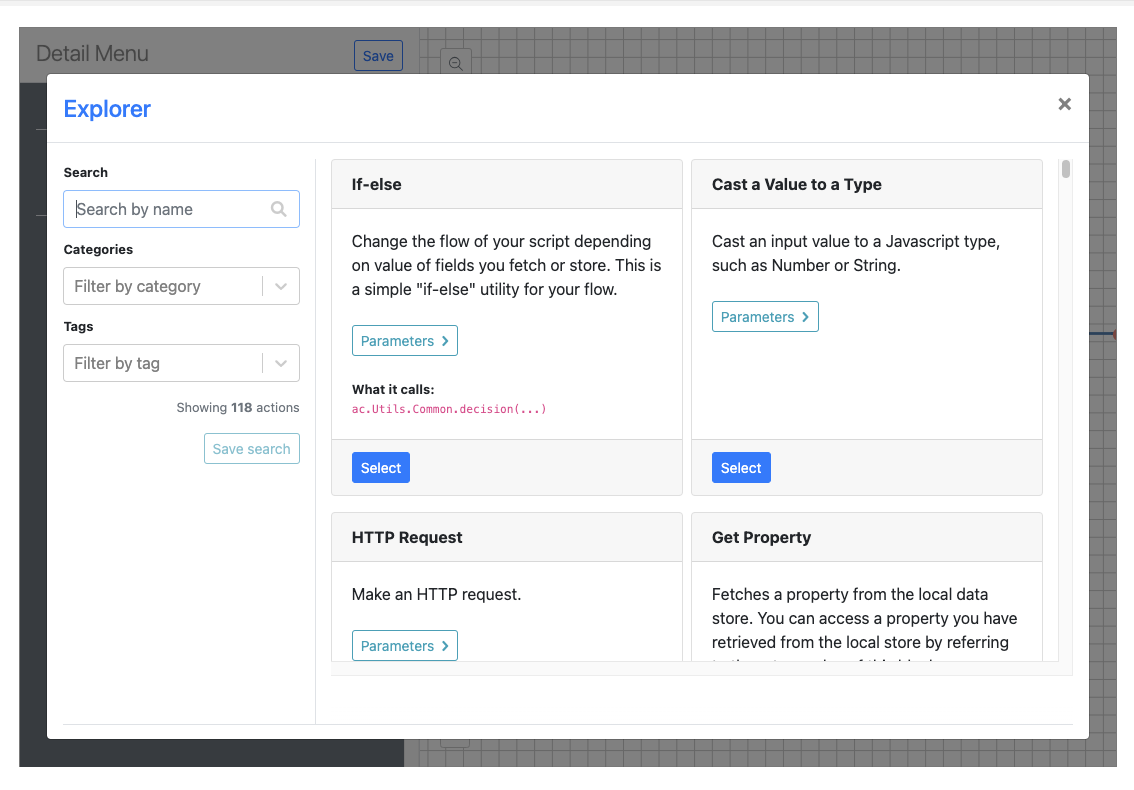
3. Drag and drop a CTI Block component on the left over to the grid on the right. A CTI Block Explorer screen will open where you would select the type of CTI Block. This is similar to adding an Action to a Lightning Flow.
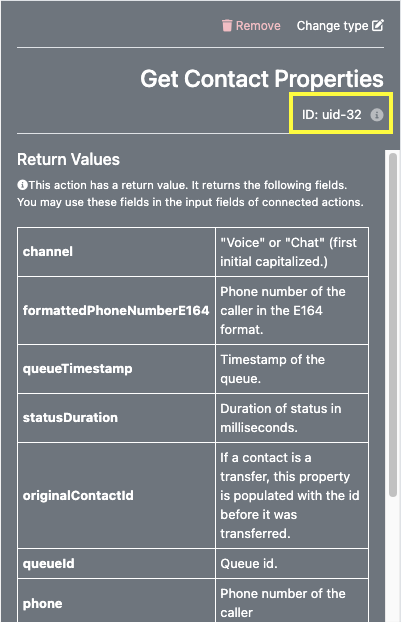
4. We want to retrieve some information regarding the incoming call, such as the phone number the customer is calling from as well as the unique identifier of the call. So in the Explorer, we filter Categories to Contact. In Amazon Connect, a contact represents each individual interaction with a customer and not the customer itself. Select the Get Contact Properties CTI Block. This block will return all the properties of the call. As you add a CTI Block, you can see each of them have an ID value (highlighted in screenshot below). This is their unique identifier which you can use in other CTI Blocks to retrieve values of the results of that specific CTI Block.
5. Drag a CTI Block onto the grid and this time, select Open Salesforce Primary Tab under the Salesforce Category. There are five optional parameters we can pass into this CTI Block: id, url, active, tabLabel, name. If you’re familiar with Salesforce Open CTI library then the names of the Salesforce CTI Blocks may seem familiar. That is because each Salesforce CTI Block is simply a representation of each Open CTI method that is available for Lightning Experience.
6. In Step 4, I mentioned that we can use the ID of the CTI block to reference the returned value. But not all input parameters in every CTI Block accepts this syntax and the “url” parameter of the Open Salesforce Primary Tab block is one such example. So we need a way to generate the URL to the Lightning Component Tab that we created along with the page parameters our LWC is expecting.
7. Drag another CTI Block onto the grid and select the String Template block type. This block will allow you to enter a number of key/value pair variables and use that to generate a String. Similar to the String.format() method in Apex.
8. Below is the key/value pair we’re going to add as variables to this block:
- phone: $.actions.{GET_CONTACT_PROPERTIES_BLOCK_ID}.results.phone
- contactid: $.actions.{GET_CONTACT_PROPERTIES_BLOCK_ID}.results.contactid
9. For template parameter, we are going to put the URL to the tab along with the variables we just set: https://{SALESFORCE_INSTANCE}.lightning.force.com/lightning/n/{TAB_NAME}?c__phone=${phone}&c__guid=${contactid}
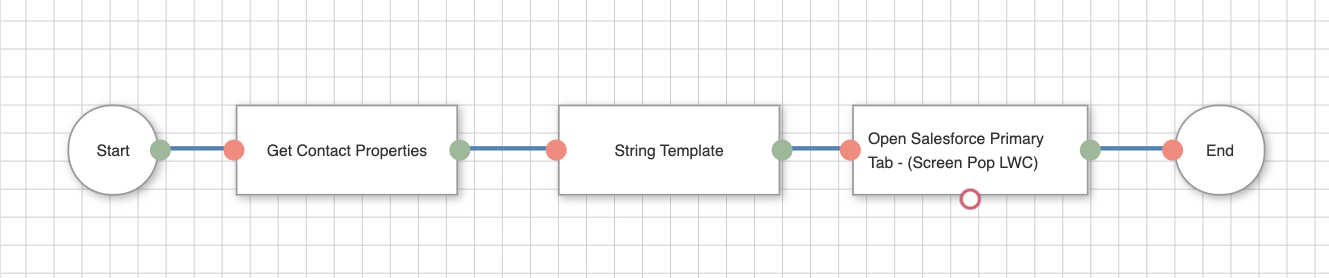
10. Let’s weave our CTI Blocks together. Connect the Start element to Get Contact Properties block which connects to the String Template block which connects to the Open Salesforce Primary Tab block which connects to the End element.
11. For the final step, open up our Open Salesforce Primary Tab block and for the url parameter, we select the result from our String Template block. Check the active parameter and enter a name for the tabLabel parameter.
12. The final product should look something like this:
See it in Action
Conclusion
I hope you have found this article somewhat helpful and that it has provided some insight into how great Amazon Connect is as an integrated CTI solution with Salesforce even outside of Service Cloud Voice. I have yet to see any other solution that offers this level of customization and configuration that can be done within Salesforce itself.
One of the biggest advantages of Amazon Connect are the other AWS products it is coupled with:
- AWS Lambda: Implement code to meet any level of customization and number of integrations required.
- AWS S3: Storage solution for call recordings, voicemails, and more.
- AWS CloudWatch: Event logging and monitoring real-time metrics.
- AWS IAM: Easily set up SSO to your Amazon Connect instance with Salesforce as the IDP (or any other)..
- Amazon Lex: Conversational AI and Chatbots.
- AWS Kinesis: Streaming service to capture large volumes of event data.
I will continue to think of interesting use cases which will highlight what else is possible when integrating Amazon Connect with Salesforce in future articles in this series. If you’re looking for an implementation partner to help you implement a CTI solution in your Salesforce ecosystem or to maximize the benefits of an existing one, don’t hesitate to reach out to us at https://www.cloudperitus.com/contact.